Glacier National Park, nestled in the wild northwest corner of Montana, is a dream destination for backpackers. With more than 700 miles of hiking trails, turquoise alpine lakes, and rugged mountain peaks, it offers a raw and unforgettable wilderness experience. Whether you’re a solo traveler seeking solitude, a couple on a budget adventure, or a nature lover drawn to untamed landscapes, Glacier promises a backpacking trip like no other.
This guide is built to help independent and budget-conscious backpackers plan a safe, affordable, and enriching trek through Glacier National Park. From when to go and how to get there, to what to pack and where to sleep, every detail is covered to make your backpacking journey as smooth as the park’s glacial-carved valleys.
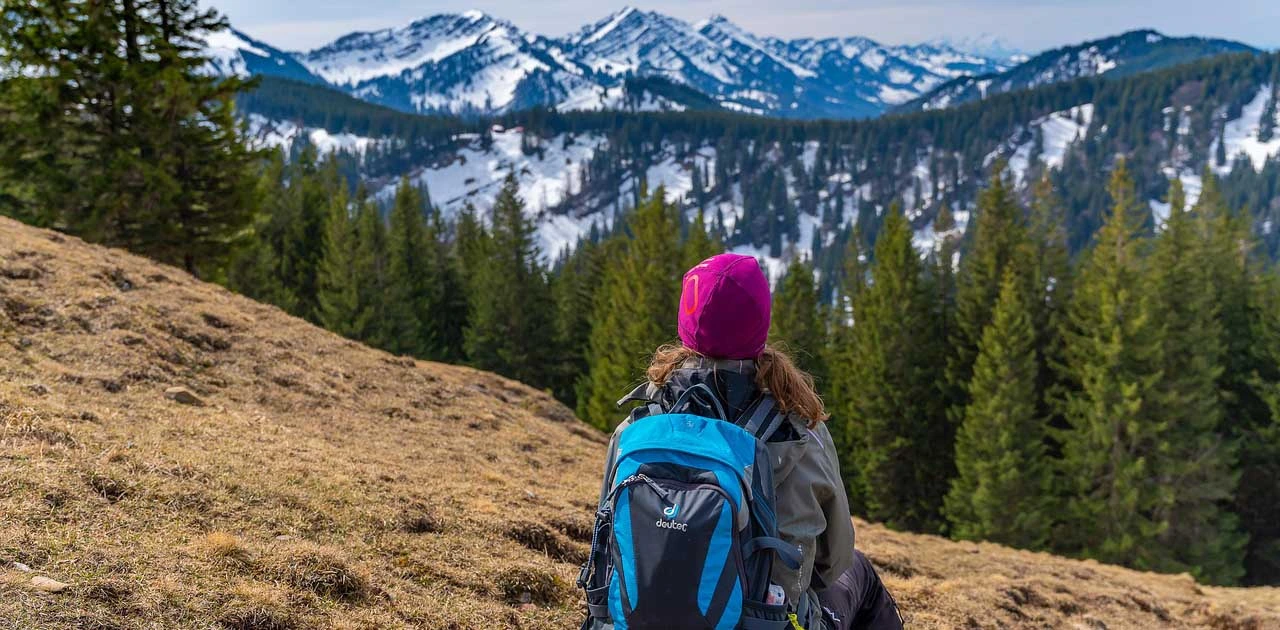
Why Backpacking in Glacier National Park is Worth It
Backpacking in Glacier isn’t just about logging miles—it’s about immersing yourself in one of the most geologically dramatic landscapes in the Lower 48. The park’s terrain includes jagged ridgelines, ancient glaciers, roaring rivers, and broad valleys filled with wildflowers. More than 130 named lakes and dense conifer forests provide the kind of raw beauty that attracts backpackers from all over the world.
The park is part of the larger Waterton-Glacier International Peace Park, shared with Canada, and it’s known for its impressive biodiversity. Wildlife sightings are common and often a highlight—grizzly bears, mountain goats, elk, moose, and even elusive wolverines roam these protected lands. Unlike more crowded parks like Yosemite or Yellowstone, Glacier still offers vast, remote areas where you can hike for hours without seeing another soul. It’s a paradise for backpackers who prefer backcountry solitude over well-trodden paths.
Best Time to Go Backpacking in Glacier National Park
Timing your trip well is essential in Glacier, as much of the park remains snow-covered until late June. The peak backpacking season runs from mid-July through early September, when trails are mostly snow-free, campsites are open, and shuttles are in operation. These months provide the best weather, with daytime highs between 65°F and 80°F and cooler nights that are ideal for sleeping under the stars.
That said, this is also when crowds are at their highest and permits are harder to secure. For budget travelers, late June and mid-September can be excellent shoulder season windows. While snow may linger on higher-elevation trails, lower valleys are usually accessible. These shoulder seasons also offer fewer people, cheaper lodging in nearby towns, and a better chance of snagging last-minute permits.
However, Glacier’s weather is unpredictable. Storms can roll in quickly even in summer, and nights can dip below freezing. Therefore, always pack extra layers and rain protection, regardless of the season.
How to Get There (and Around on a Budget)
Getting to Glacier National Park is relatively straightforward, but it takes some planning, especially for budget-conscious travelers. The park has two main access points: West Glacier and St. Mary, located on opposite ends of the famous Going-to-the-Sun Road.
If you’re flying, the closest airport is Glacier Park International Airport (FCA) in Kalispell, Montana—just 30 minutes from West Glacier. For cheaper flight options, you can also look at Missoula (MSO), about 2.5 hours south, or even Spokane, Washington (GEG), which is a 5-hour drive. Budget airlines sometimes offer deals into these larger hubs.
From these airports, you can rent a car, though that can be expensive in peak season. To save, consider using the Glacier Park Express Shuttle from Kalispell or Whitefish during summer months, which connects to West Glacier. Alternatively, Amtrak’s Empire Builder stops right at West Glacier Station, making it one of the few national parks accessible by train—a great option if you’re coming from Seattle, Chicago, or Minneapolis.
Once inside the park, the free Glacier National Park Shuttle operates along the Going-to-the-Sun Road, helping hikers access popular trailheads without a car. However, this shuttle doesn’t reach backcountry trailheads on the park’s north or south edges. For those areas, budget backpackers often arrange group transport, split taxi rides, or hitchhike safely, a relatively common practice among seasoned Glacier hikers.
When planning your entry, don’t forget about the Vehicle Reservation System, which requires advance timed-entry tickets for Going-to-the-Sun Road during the summer. Backpackers with a valid wilderness camping permit can bypass this requirement, making it even more appealing to go deeper into the park.
Suggested Backpacking Itineraries
Glacier National Park offers a range of routes for all experience levels. Whether you’re planning a weekend escape or a weeklong wilderness trek, the park’s network of backcountry trails has something for you.
3-Day Intro Trip: Granite Park to Many Glacier
This beginner-friendly itinerary covers the scenic Highline Trail from Logan Pass to Granite Park Chalet. It includes a night at Granite Park and another at Many Glacier. With sweeping views of glacial valleys and frequent mountain goat sightings, this route provides a taste of the park’s best features. The trail spans about 12 miles and can be stretched to three days for a leisurely pace.
5-Day Moderate Trip: Gunsight Pass Loop
For those looking for more elevation gain and varied terrain, the Gunsight Pass Trail is a classic. Starting at Jackson Glacier Overlook and ending at Lake McDonald, this 5-day route covers 30–35 miles. Expect alpine lakes, dramatic cliffs, and panoramic glacier views. Campgrounds like Gunsight Lake, Lake Ellen Wilson, and Sperry are well-situated and offer scenic overnight stops.
7-Day Full Loop: Northern Traverse (Boulder Pass to Waterton Valley)
This route is ideal for experienced backpackers seeking solitude and lesser-used trails. Start at Kintla Lake and travel through Boulder Pass, Hole-in-the-Wall, and down into the Waterton Valley, eventually exiting via Goat Haunt. You’ll cover around 60–70 miles, cross high alpine passes, and encounter remote wildlife habitats. You’ll need a detailed backcountry permit and a passport if you exit into Canada.
Budget Accommodation Options
Backpackers traveling on a budget will be happy to know Glacier offers several cost-effective options. First and foremost, backcountry permits are required for all overnight treks, but the cost is reasonable—$10 per permit plus $7 per person, per night.
You can reserve permits in advance through the Recreation.gov system, which opens in March each year. Some spots are held for walk-in permits available at ranger stations up to a day before your trip. To save money and increase your chances, plan for flexibility and have multiple routes ready.
If you’re staying near trailheads before or after your hike, there are frontcountry campgrounds like Apgar, Sprague Creek, and Many Glacier, which charge around $20–30 per night. These fill up quickly in summer, so booking in advance or arriving early is essential. A few first-come, first-served sites may still be available outside of peak dates.
For travelers without a tent, nearby towns like Columbia Falls and East Glacier offer affordable motels and hostels. Look for small lodges with shared rooms or rustic cabins—prices start around $70–100 per night during the shoulder season.
Backpacking Costs in Glacier National Park
Backpacking Glacier can be surprisingly budget-friendly if you prepare smartly. Here’s a breakdown of the typical costs:
- Backcountry permit: $10 application fee + $7 per person per night
- Park entrance fee: $35 per vehicle (valid for 7 days)
- Transportation/shuttle: Free in-park shuttle (on Going-to-the-Sun Road); budget around $20–$40 if using regional buses or shuttles
- Gear rental: Tent, sleeping bag, and bear spray rentals can cost $15–30/day from outfitters in Whitefish or Kalispell
- Food: DIY backpacking meals run about $10/day; premade dehydrated meals are $7–$12 each
- Campgrounds pre/post hike: $20–30 per night
Total cost for a 5-day backpacking trip can land under $200–250, not including travel to Montana. To save even more, share rental cars with fellow hikers, prepare your own meals, and borrow gear if possible.
Must-Pack Essentials for Glacier National Park
Glacier’s environment is rugged, remote, and often unpredictable. Your gear should reflect that.
Recommended items for every backpacker:
- Lightweight tent – 3-season with rainfly
- Sleeping bag – Rated for temps as low as 20–30°F
- Sleeping pad – Insulated and compact
- Layers – Quick-dry base layers, fleece or puffy jacket, and waterproof shell
- Stove – Small backpacking stove (Jetboil or similar) with fuel
- Water filtration system – Sawyer Squeeze or Katadyn pump
- Bear spray – Required and essential
- Bear-resistant food container – Hard-sided bear canisters are mandatory in some zones
- Navigation tools – Paper maps + offline GPS (Gaia or AllTrails)
- Trekking poles – Especially useful on steep passes
- Headlamp – With extra batteries
- First-aid kit – Include blister care and basic meds
Many of these items can be rented or purchased at outdoor stores in Kalispell, Whitefish, or West Glacier. Affiliate-worthy options include brands like MSR (stove), Therm-a-Rest (pad), and Gregory or Osprey (packs).
Top Things to Do for Backpackers
Glacier National Park is more than just hiking. Backpackers get access to areas few day-hikers reach.
- Scenic vistas: Logan Pass, Piegan Pass, and Ptarmigan Tunnel offer unforgettable views.
- Wildlife watching: Watch for mountain goats, grizzly bears, bighorn sheep, and even the elusive wolverine.
- Glacial lakes: Iceberg Lake and Lake Ellen Wilson are top highlights, with turquoise waters and floating icebergs even in mid-summer.
- Photography: Early mornings and golden hours light up the mountains—bring a compact tripod if you’re into landscape shots.
- Tidepools and ocean views? Not here! Unlike Olympic or Big Sur, Glacier is a mountain-dominated inland park with no ocean access, but glacial valleys and river crossings provide their own kind of dramatic water scenes.
Food and Water Tips for Backpackers
While you’ll find plenty of freshwater sources in Glacier, treat everything before drinking. Alpine streams may look pristine, but they can carry harmful bacteria. Use a pump filter, UV purifier, or boil water for at least 60 seconds.
Plan your meals carefully. You’ll want lightweight, calorie-dense foods that won’t spoil. Great options include:
- Instant oatmeal
- Dehydrated meals
- Tuna or salmon pouches
- Trail mix and energy bars
- Tortillas and nut butter
Store all food in a bear canister or hang it using the counterbalance method if allowed. Never leave trash or snacks unattended. Most backcountry campsites have designated food prep zones, and you’ll need to pack out all waste.
Safety Tips for Backpacking in Glacier National Park
Glacier National Park is wild, remote, and home to potentially dangerous terrain and wildlife. Trail safety begins with preparation—check trail conditions with the National Park Service before setting out. Snow can linger on high passes into July, and sudden storms are common even in midsummer.
Wildlife safety is critical here. Both grizzly and black bears roam the park, especially in backcountry zones. Carry bear spray, make noise while hiking, and store food properly using a bear-resistant canister. Also, be cautious around moose—they can be aggressive if surprised. Ticks are occasionally found in lowland brushy areas, so do a full-body check daily.
Weather in Glacier changes fast. Always bring rain gear and insulation layers—even in July, it can snow at high elevations. Cell service is unreliable in most areas. Carry a map, compass, or offline GPS, and consider a satellite messenger or emergency beacon if heading into more isolated routes. For emergencies, rangers can be contacted from most trailheads or staffed lodges like Granite Park Chalet.
Eco-Friendly and Responsible Travel Tips
Glacier National Park is part of a delicate ecosystem, and practicing Leave No Trace principles is essential. Always stay on designated trails to reduce erosion and protect alpine vegetation, which is slow to recover when damaged.
All trash—including food wrappers, biodegradable waste, and hygiene products—must be packed out. Human waste should be buried at least 6–8 inches deep and 200 feet away from water sources. Use a WAG bag in areas where digging isn’t allowed or practical.
When storing food, use a bear canister or hang bags with proper distance from your sleeping area. Never cook near tents or leave scented items unattended. To reduce plastic, bring reusable bottles, bulk meal packaging, and cloth bags. Glacier’s wilderness is what makes it special—let’s keep it that way.
Recommended Apps & Tools for Backpackers
Technology can be a helpful companion on a Glacier backpacking trip, especially when it comes to navigation, trip planning, and weather tracking.
- Gaia GPS – Offers downloadable trail maps with elevation and terrain overlays. Great for offline use in no-signal zones.
- AllTrails Pro – Handy for reading trip reviews and tracking your hike. The pro version allows offline access and custom route planning.
- FarOut (formerly Guthook) – Features trail-specific waypoints, camp zones, and water sources—ideal for longer treks.
- Recreation.gov App – Essential for managing your backcountry permit reservations and checking availability for last-minute changes.
- NPS App – Provides real-time alerts, maps, and info from Glacier’s park rangers.
- Windy or NOAA Weather – For tracking conditions at elevation, especially when planning high passes like Siyeh or Pitamakan.
Many of these apps work best when downloaded in advance. Glacier’s remoteness means data signals can’t be relied on, so plan your digital tools like your gear—intentionally and offline-ready.
Frequently Asked Questions
Yes, a backcountry permit is required for all overnight trips. You can apply through Recreation.gov starting in March or get a walk-in permit at ranger stations, depending on availability.
Late July to mid-September offers the most reliable weather and snow-free trails. Early season (June) often has snow on high passes, while late September can bring colder temps and early snowstorms.
They are highly recommended and sometimes required in specific zones. You can rent them from visitor centers or local gear shops. Hanging food is only allowed in designated areas with proper infrastructure.
Yes, but always treat it first. Use a reliable water filter, UV purifier, or boil it. Glacier’s streams may look clean but can carry harmful microorganisms.
Start with how many days you have and your experience level. Popular routes include the Highline Trail, Gunsight Pass, and Boulder Pass. Use tools like AllTrails or the NPS trip planner to compare distances, elevation, and permit availability.
Absolutely, though solo hikers should be especially cautious with wildlife and navigation. Carry bear spray, stick to well-traveled routes, and let someone know your itinerary.
Yes, the Going-to-the-Sun Road shuttle runs in peak summer and is free. It connects major trailheads like Logan Pass, The Loop, and St. Mary Visitor Center. It’s a great way to plan point-to-point hikes without a second car.
You can contact rangers at staffed backcountry locations like Sperry Chalet or Many Glacier. It’s smart to have a flexible itinerary and carry a map with alternate routes marked.
No, camping is allowed only in designated backcountry campsites with your reserved itinerary. Sites include food prep areas, pit toilets, and bear storage poles when available.
Even in July, nights can dip into the 30s°F, especially at high elevations. Always bring a warm sleeping bag and thermal layers.
Robert Starke is a graphic designer with a keen eye for detail and a strong background in video editing. Beyond his creative work, he’s an avid traveler and passionate writer who enjoys sharing practical, engaging advice with fellow adventurers. A lifelong animal lover, Robert also writes about pet products for other websites. Here at Traveleon.com, he focuses mainly on camping, hiking, and backpacking—offering firsthand tips, gear guides, and destination insights to help readers make the most of their time outdoors.